Electricity bills are rising every year. Many people install solar but still overpay. Why? They ignore the net metering application process. If done wrong, your savings drop fast.
This guide explains how to apply for net metering, the total cost, timeline, and common mistakes to avoid. Before starting your net metering application, it is important to understand the basics of solar energy and how rooftop systems actually work.
Net Metering Application Process (Step-by-Step Guide)
How to Apply for Net Metering Without Delays or Rejection
Most people delay their net metering application. They install solar first and apply later. This causes rejection and long delays. Follow this exact net meter approval process — it saves time and avoids costly mistakes.
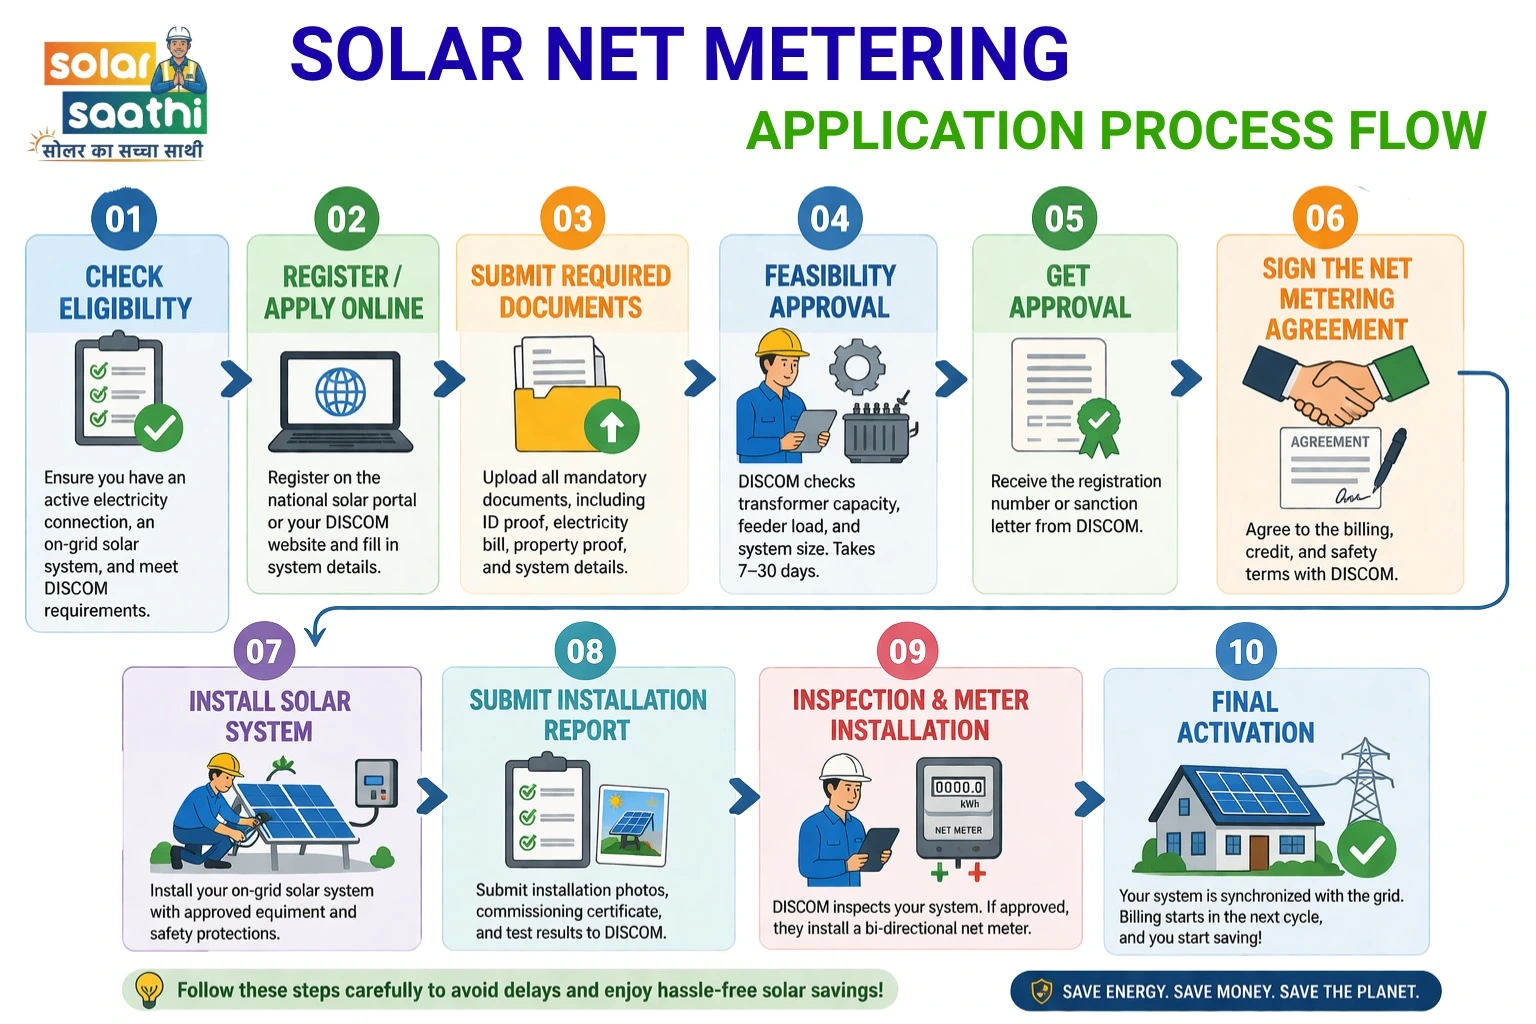
Step 1: Check Eligibility Before You Apply
Start your net metering application only after checking eligibility. This step avoids rejection at the first stage.
You must meet these conditions:
- Active electricity connection
- Only on-grid solar system allowed
- System size within DISCOM limits
- Electricity bill in your name
For systems up to 10 kW, approval is faster. Choosing the right system size is important. You can use our solar calculator to estimate your ideal capacity.
Step 2: Register on the Solar Portal
Now start your net metering application online. Use the national solar portal or your DISCOM website. Fill in details carefully — consumer number, mobile number and email, installation address, solar system capacity, and inverter details. Wrong details delay your net meter approval process.
If you are unsure about technical inputs like inverter capacity or system configuration, you can get help from a professional solar consultancy expert for accurate details.
Where to Apply for Net Metering:
- PM Surya Ghar Rooftop Solar Portal
- State DISCOM websites (e.g. Rajasthan Solar Energy)
- Local electricity office
- Solar installer or consultant
Online application is faster and also helps you track your net meter application status easily.
Step 3: Submit the Required Documents
Upload all required documents. Do not leave any field empty — missing documents slow down your application. Many homeowners face delays because they do not fully understand their system design or technical documents. If you are unsure, refer to our solar panel technology guide.
Common net metering documents required include: ID proof (Aadhaar or PAN), latest electricity bill, property proof or NOC, solar system design (SLD), and inverter and panel datasheets. Incomplete documents slow your net metering DISCOM process.
Step 4: DISCOM Feasibility Approval
After submission, DISCOM reviews your request. The engineer checks transformer capacity, local feeder load, your connection details, and the proposed solar system size. This step takes around 7 to 30 days.
What Happens During a Feasibility Check?
DISCOM checks if your area can handle solar export. If yes, you get approval. If no, the system size may be reduced. For example, you apply for 10 kW but DISCOM may approve only 7 kW. Always wait for feasibility approval — installing before approval can lead to rejection.
Step 5: Approval and Registration
Once verified, DISCOM gives approval. You receive a registration number or sanction letter. This step takes around 10 to 15 days. After approval, you become eligible to install solar.
Step 6: Sign Net Metering Agreement
Now sign the agreement with DISCOM. This activates your net metering account. The agreement includes billing calculation rules, exported unit credits, safety requirements, and meter access terms. Without this step, meter installation will not happen.
Step 7: Install the Solar System
Now install your solar system. Always choose an MNRE-empanelled vendor. Choosing the wrong installer can reduce your savings significantly. If you are unsure, you can take help from a solar vendor selection consultant.
Your system must include solar panels, an on-grid inverter, earthing system, lightning protection, and proper wiring. Do not connect to the grid yet and do not install before approval — this is a major net metering problem in India and a common reason for rejection.
Step 8: Submit Completion Report
After installation, your installer uploads the work completion report with installation photos, commissioning certificate, inverter safety certificate, and system test results. This step triggers the inspection request.
Step 9: DISCOM Inspection & Net Meter Installation
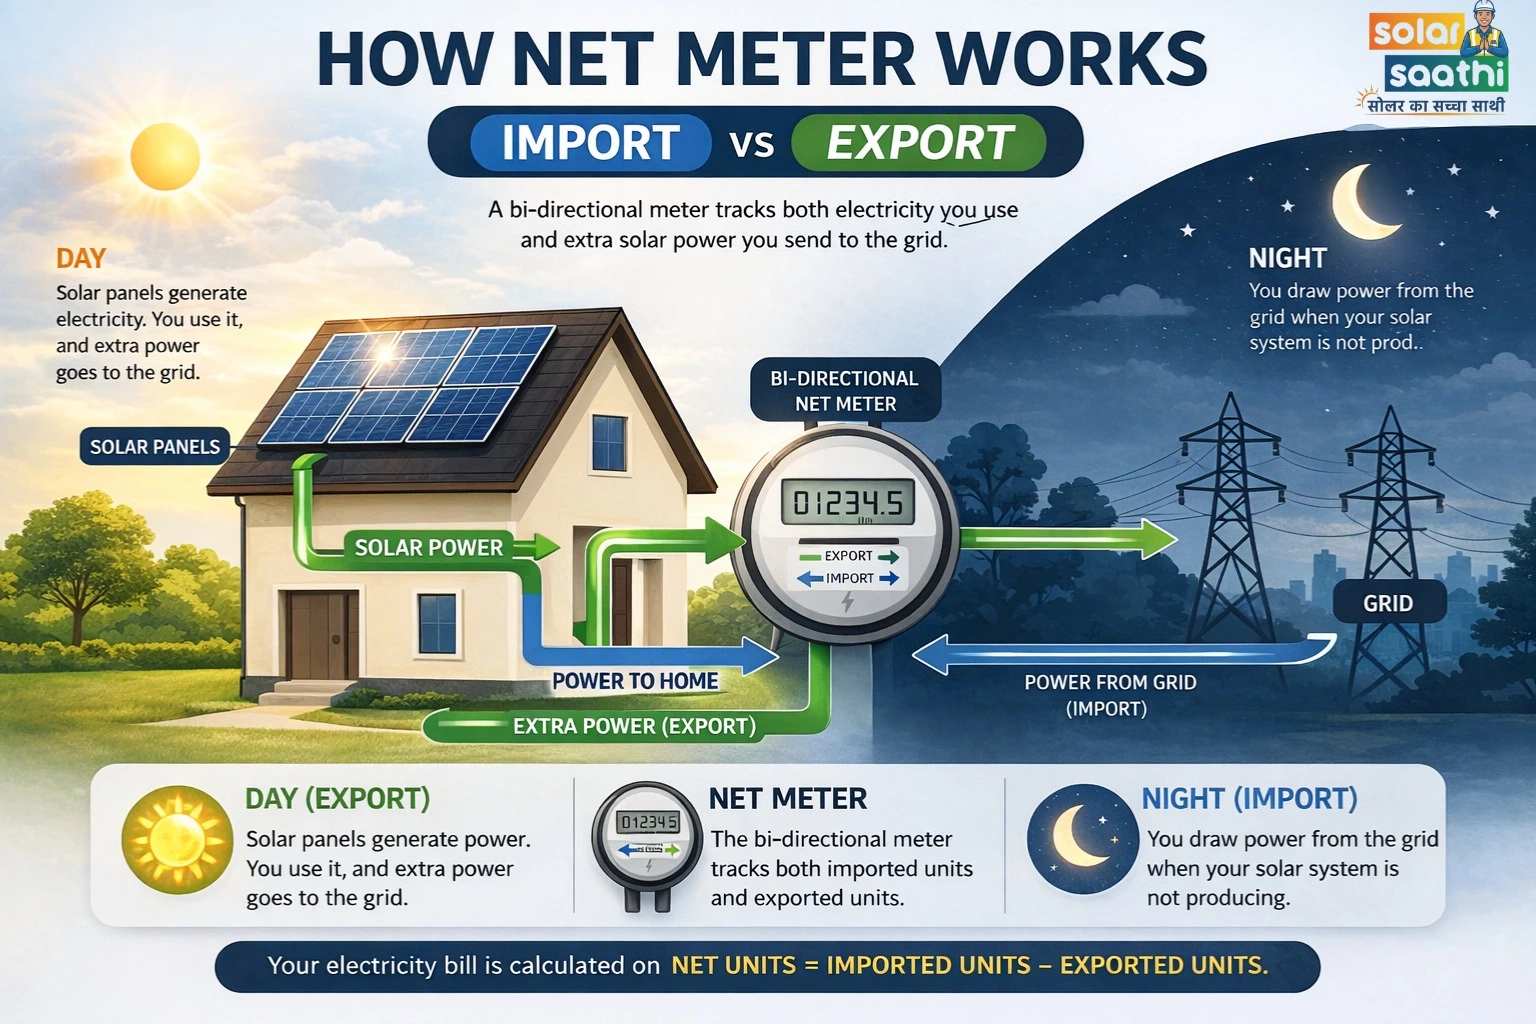
DISCOM sends an engineer for inspection. They verify wiring and earthing, inverter safety (anti-islanding), approved system size, and installation quality. If approved, DISCOM installs a bi-directional meter that tracks both electricity import and export.
Net Meter Installation Cost in India
The net metering cost in India depends on your state and DISCOM. In most cases, you pay small charges during the process — application fees, inspection charges, net meter installation costs, and agreement charges.
Total estimated cost: ₹1,000 to ₹6,500
Some states also offer free net meter installation under subsidy schemes.
Step 10: Final Connection and System Activation
After meter installation, your system is synchronized with the grid. Billing starts in the next cycle. Your bill shows:
Net Payable Units = Imported – Exported
If you export extra power, you get credits. Always check readings to avoid billing errors — many users face electricity bill increases after solar due to errors.
Summary of Net Metering Application Process (Quick Steps)
- Check Eligibility
- Register/Apply Online
- Submit Required Documents
- Feasibility Approval
- Get Approval — Receive the registration number or sanction letter
- Sign the net metering agreement
- Install Solar System
- Submit the solar installation completion report
- Inspection & Meter Installation
- Final Activation & Billing Start
Documents Required for Net Metering Application
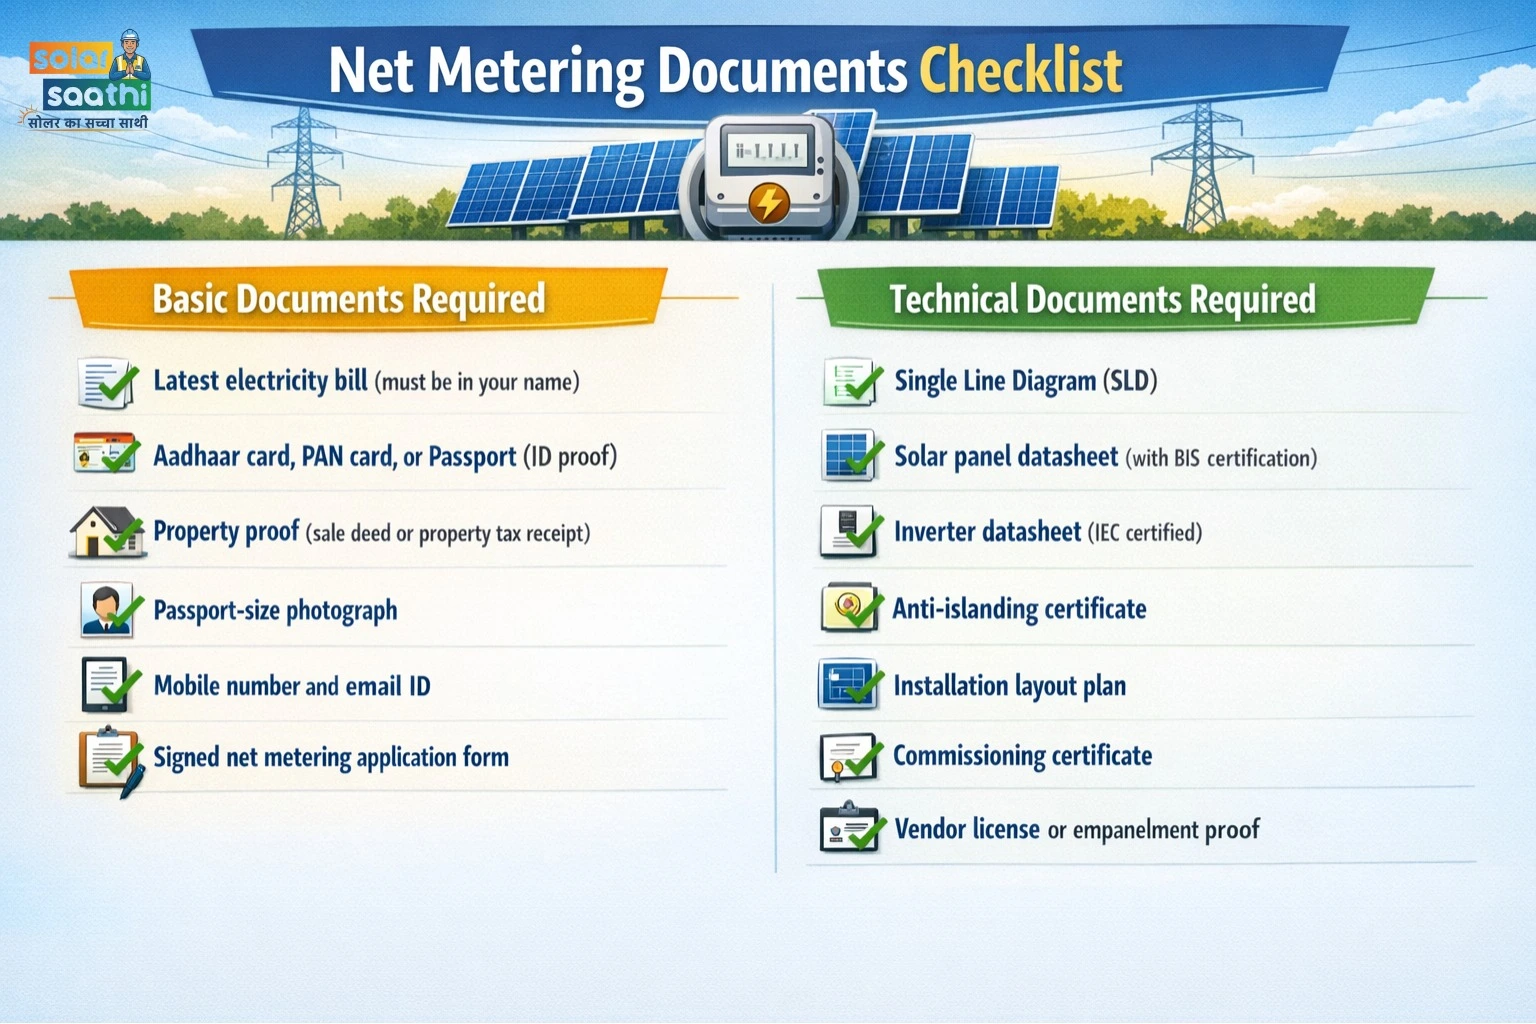
Many net metering applications get delayed due to missing documents. If you keep all papers ready, approval becomes faster and smoother.
Basic Documents Required
These are mandatory for every net metering application in India. You must submit clear and valid documents.
- Latest electricity bill (must be in your name)
- Aadhaar card, PAN card, or Passport (ID proof)
- Property proof (sale deed or property tax receipt)
- Passport-size photograph
- Mobile number and email ID
- Signed net metering application form
Technical Documents Required
Your solar installer usually provides these documents. These are important for DISCOM technical approval.
- Single Line Diagram (SLD)
- Solar panel datasheet (with BIS certification)
- Inverter datasheet (IEC certified)
- Anti-islanding certificate
- Installation layout plan
- Commissioning certificate
- Vendor license or empanelment proof
Missing technical papers often cause net metering problems in India.
Complete Documents Checklist
| Document Type | What You Need | Why It Is Important |
|---|---|---|
| Identity Proof | Aadhaar, PAN, Passport | Confirms applicant identity |
| Electricity Connection | Latest electricity bill | Links system to your meter |
| Property Proof | Sale deed, tax receipt | Confirms ownership |
| Tenant Proof | Rent agreement + NOC | Required if property is rented |
| System Design | Single Line Diagram (SLD) | Shows system connection |
| Equipment Details | Panel & inverter datasheets | Confirms compliance |
| Safety Documents | Anti-islanding certificate | Ensures grid safety |
| Installation Proof | Layout plan & photos | Confirms actual setup |
| Commissioning Report | Installer certificate | Required before meter installation |
| Vendor Details | Empanelment proof | Confirms approved installer |
| Application Form | Signed application form | Required to start process |
Documents Required for Tenants or Flats
If the property is not in your name, extra documents are needed. DISCOM checks ownership very strictly. You must submit an NOC from the property owner, rent agreement, society approval letter, and apartment association NOC. Without these, your net metering application may get rejected.
Net Metering Approval Timeline & Status Tracking
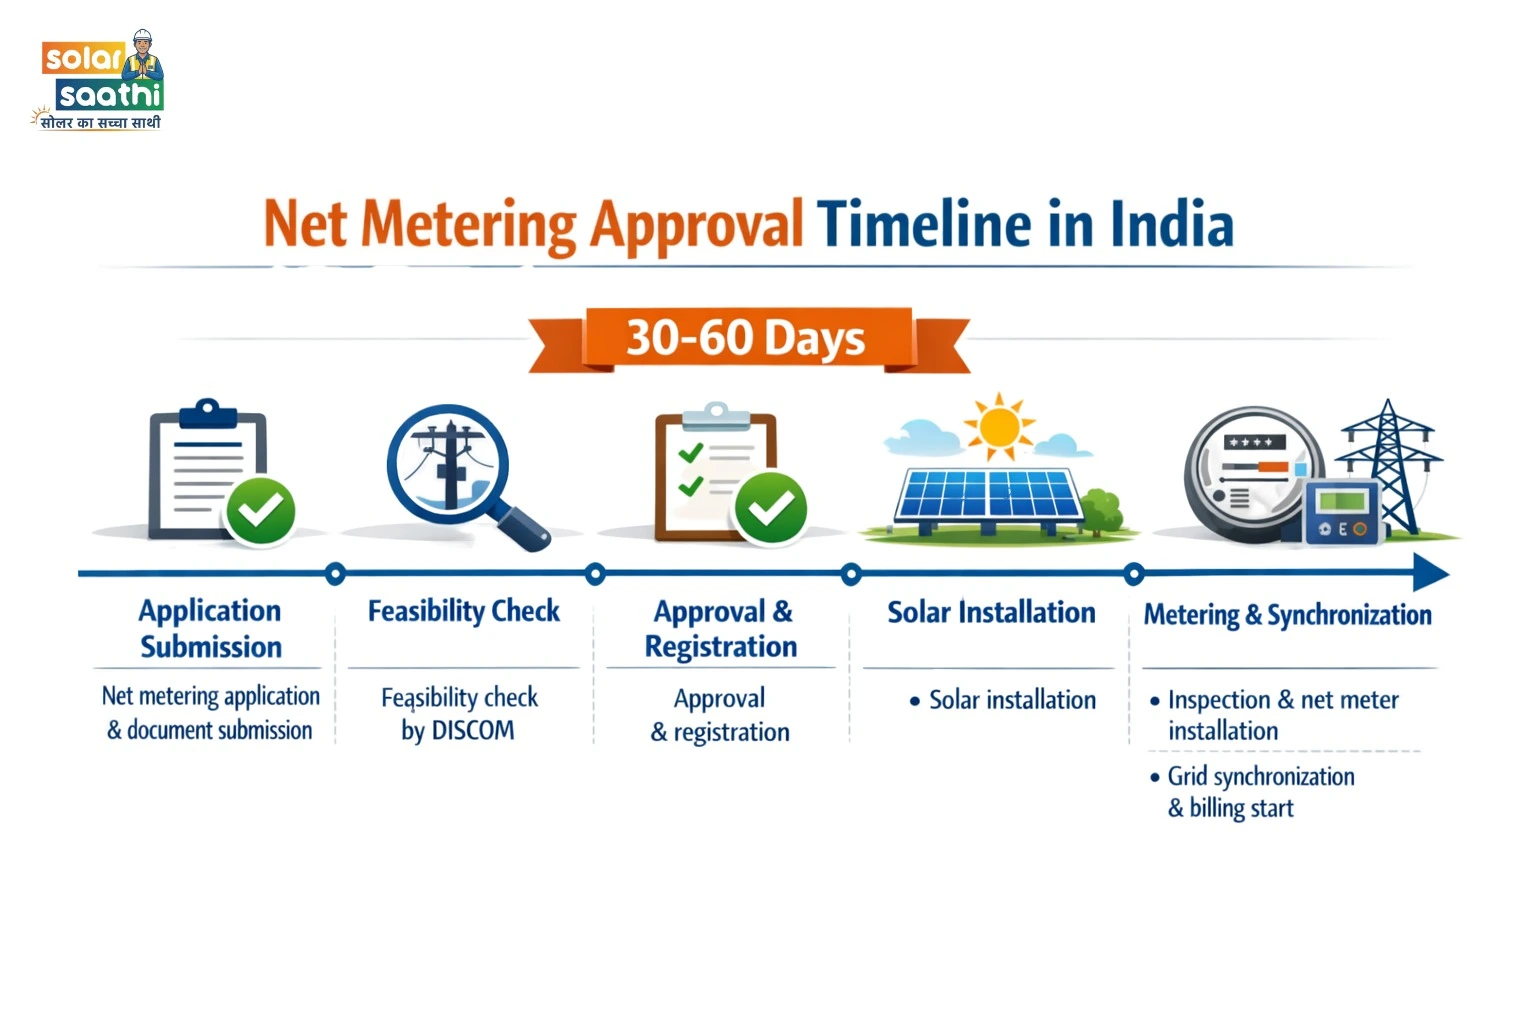
Most people install solar and then wait without updates — this is where frustration starts. In India, the net meter approval process usually takes 30 to 60 days. In some cases it can extend to 2–3 months due to DISCOM workload.
Typical Net Metering Approval Timeline
| Step | Process Stage | Expected Time |
|---|---|---|
| 1 | Application & document submission | 1 to 5 days |
| 2 | Feasibility check by DISCOM | 7 to 30 days |
| 3 | Approval & registration | 10 to 15 days |
| 4 | Solar installation | 7 to 15 days |
| 5 | Inspection & net meter installation | 7 to 21 days |
| 6 | Grid synchronization & billing start | 2 to 5 days |
If everything goes smoothly, the process completes in 3–6 weeks. But realistically, plan for 1–2 months.
State-Wise Net Meter Approval Timeline (2026)
Faster States: Gujarat (7–15 days), Delhi (15–30 days), Maharashtra (15–30 days), Karnataka (21–30 days).
Slower States: Rajasthan (30–60 days), Uttar Pradesh (30–60 days), Tamil Nadu (30–60 days). Delays usually happen due to inspection backlog.
How to Check Net Meter Application Status
Always track your net meter application status regularly. If you track properly, you can avoid delays and confusion.
1. Use National Solar Portal (PM Surya Ghar)
Login to the national solar portal to check application progress, approval status, inspection updates, and subsidy status — all in one place.
2. Visit Your DISCOM Website
Every state has its own electricity portal. Just enter your application number or consumer number to see current status.
3. Check SMS and Email Updates
DISCOM sends updates on your mobile and email for feasibility approval, inspection schedule, and net meter installation. Do not ignore these messages.
4. Ask Your Solar Installer
Your installer also tracks your application and deals with DISCOM regularly. If you feel stuck, contact them directly — they can push your file faster.
State DISCOM Portals (Direct Tracking Links)
- Maharashtra: mahadiscom.in (Rooftop Solar section)
- Delhi: bsesdelhi.com or tatapower-ddl.com
- Karnataka: bescom.org
- Haryana: esolarconn.dhbvn.org.in
- Rajasthan: energy.rajasthan.gov.in/home
Key Rajasthan DISCOM Websites:
- Jaipur Vidyut Vitran Nigam Ltd (JVVNL): energy.rajasthan.gov.in/jvvnl
- Ajmer Vidyut Vitran Nigam Ltd (AVVNL): energy.rajasthan.gov.in/avvnl
- Jodhpur Vidyut Vitran Nigam Ltd (JdVVNL): energy.rajasthan.gov.in/jdvvnl
Net Metering Approval Checklist
Use this checklist to avoid rejection and save time.
1. Application & Documentation Checklist
- Completed and signed application form
- Aadhaar, PAN, Passport, or Voter ID
- Latest electricity bill with CA number
- Property ownership proof or rent agreement
- NOC from owner (if rented property)
- Application or processing fee receipt
2. Technical Documents Checklist
- Single Line Diagram (SLD)
- Solar panel datasheet
- Inverter datasheet
- BIS / IEC certification proof
- Grid interconnection details
- System layout plan
Always use certified equipment — this avoids future net metering problems in India.
3. Site & Installation Checklist
- Proper rooftop space available
- Strong roof structure
- Correct panel installation layout
- Earthing and lightning protection installed
- AC and DC safety breakers installed
- Space available for net meter
4. Final Approval & Agreement Checklist
- Signed net metering agreement
- Work completion report
- Commissioning certificate
- Safety certificate (if required)
Only after this does DISCOM install the net meter.
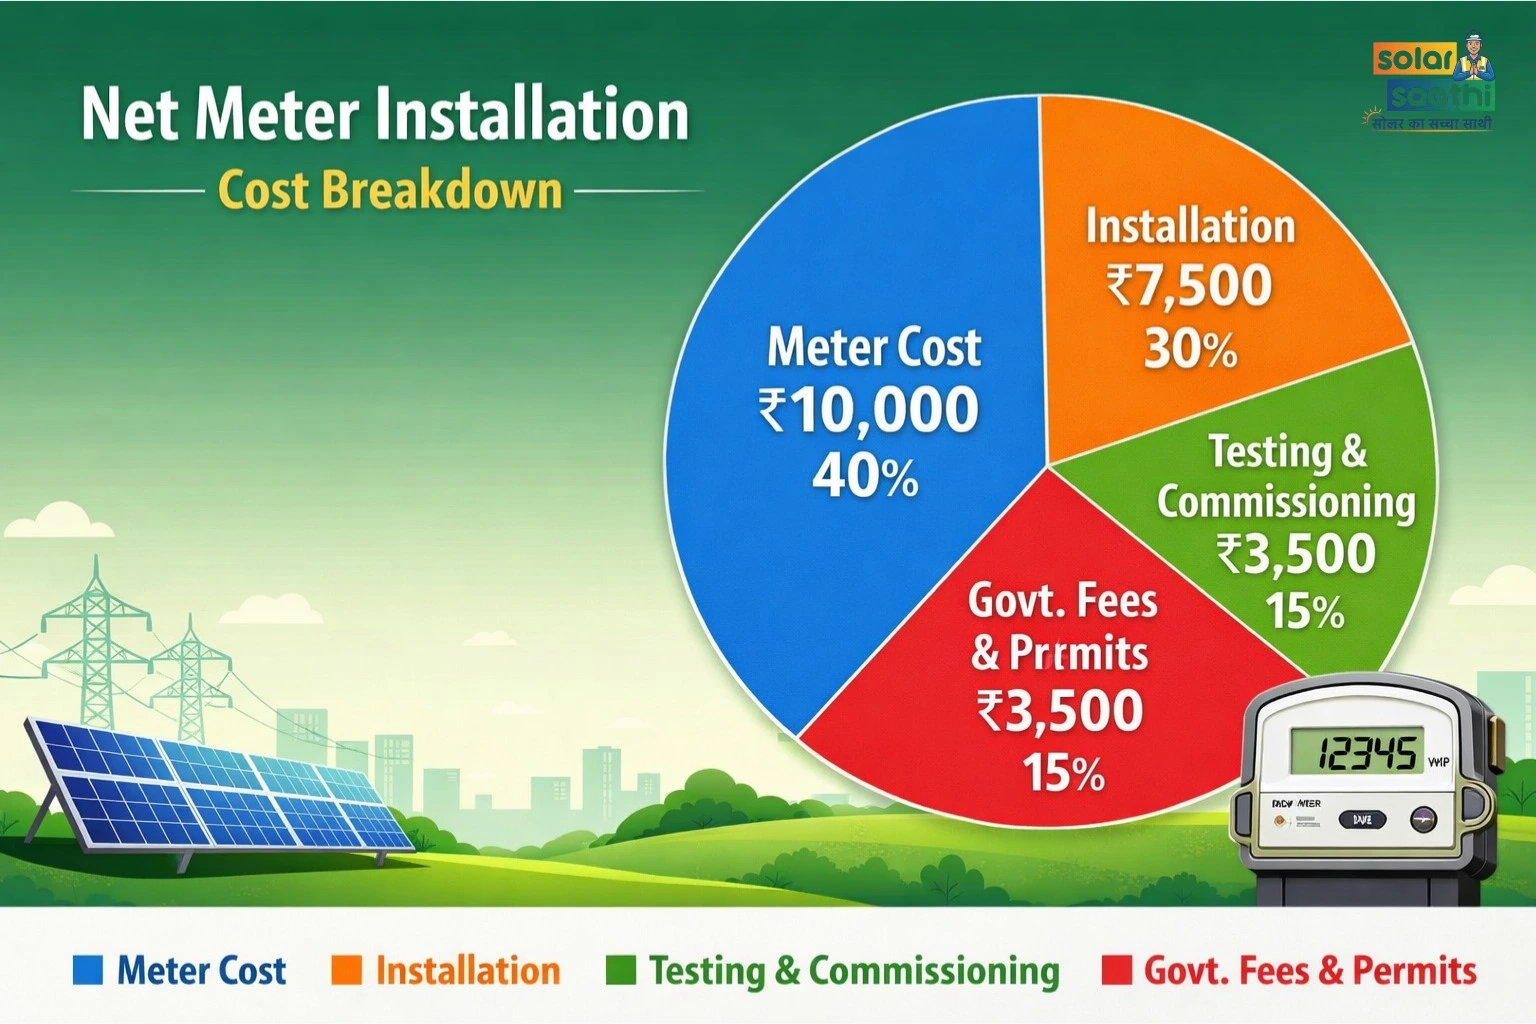
Net Meter Installation Cost in India
The net meter installation cost mainly depends on the type of meter. Most homes use a single-phase meter, while bigger properties or businesses need a three-phase setup. To understand how much you can actually save and your payback period, you can use our solar savings calculator.
Net Metering Cost Breakdown
- Single-phase net meter: ₹2,000 – ₹3,500 (Approx.)
- Three-phase net meter: ₹4,000 – ₹6,000 (Approx.)
- Installation and testing charges: ₹1,000 – ₹2,000 (Approx.)
- Total setup cost: ₹3,000 – ₹8,000
In some cases, the total cost can go up to ₹15,000. This depends on system size and DISCOM rules.
What Is Included in Net Metering Costs?
The total net metering cost in India includes multiple parts — it is not just the meter price. The cost includes the application fee, net meter hardware (bi-directional meter), testing and commissioning charges, and installation charges.
Detailed Cost Range:
- Application fee: ₹500 – ₹2,500
- Single-phase meter: ₹1,500 – ₹3,500
- Three-phase meter: ₹4,000 – ₹8,000
- Testing charges: ₹100 – ₹1,200
Most homeowners pay between ₹1,000 and ₹8,000 overall.
State-Wise Application Fees
Application fees vary by state. This is part of the net metering DISCOM process.
| State | Application Fee (Approx.) | Approval Time |
|---|---|---|
| Delhi | ₹500 | 30 days |
| Gujarat | ₹1,000 | 10–15 days |
| Haryana | ₹1,000 | 15 days |
| Maharashtra | ₹1,000 | 15 days |
| Rajasthan | ₹200 – ₹500 | 15 days |
| Uttar Pradesh | ₹250 | 30 days |
Always confirm charges with your local DISCOM.
Factors Affecting Net Meter Installation Cost
The net meter installation cost is not the same everywhere. Key factors include: state DISCOM rules, type of connection (single or three-phase), solar system size (kW), residential or commercial usage, and whether the meter is provided by DISCOM or a private vendor. Some states require two meters instead of one, which increases the total net metering cost in India.
Plan Before You Apply: Calculate Savings & ROI
Most people skip planning — that is a costly mistake. Before applying, check your monthly electricity usage, choose the correct solar system size, and estimate export vs consumption.
If planned well, your bill reduces by 70%–100%, payback becomes faster, and ROI improves significantly. You can use a solar calculator to estimate system size and a savings calculator to understand your return on investment.
Is Net Metering Right for You?
Net metering is not for everyone. It works best if you use power during the daytime, have a shadow-free rooftop, and your DISCOM supports net metering. Avoid it if your usage is very low or roof space is limited. Right sizing is the key to savings.
Common Problems After Net Meter Installation (With Fixes)
Many users face issues after installation. Here are the most common net metering problems in India:
- Export units not showing — Raise a complaint with DISCOM
- Wrong billing — Cross-check meter readings
- Delay in approval — Follow up regularly
- Low solar generation — Check system performance
If your system is underperforming, it usually means something is wrong with installation, panel angle, or system design. In such cases, a professional check can help identify the issue early. You can get expert help through Solar Saathi's solar system performance consultancy.
Why Your Electricity Bill May Increase After Net Metering
This is a common complaint. Reasons for electricity bill increase after solar include: export units not recorded, incorrect billing calculation, high fixed charges, and poor system performance.
Always verify your first 2–3 bills after net meter installation. Many users face this due to poor system design or wrong installation. It is important to understand the real pros and limitations before installing — you can read a detailed guide on the advantages and disadvantages of solar energy.
Key Challenges in Net Metering in India
The system has real issues you should be aware of: different rules in every state, DISCOM delays and approvals, capacity limits for systems, and policy changes over time. You must understand your local policy first before starting your net metering application.
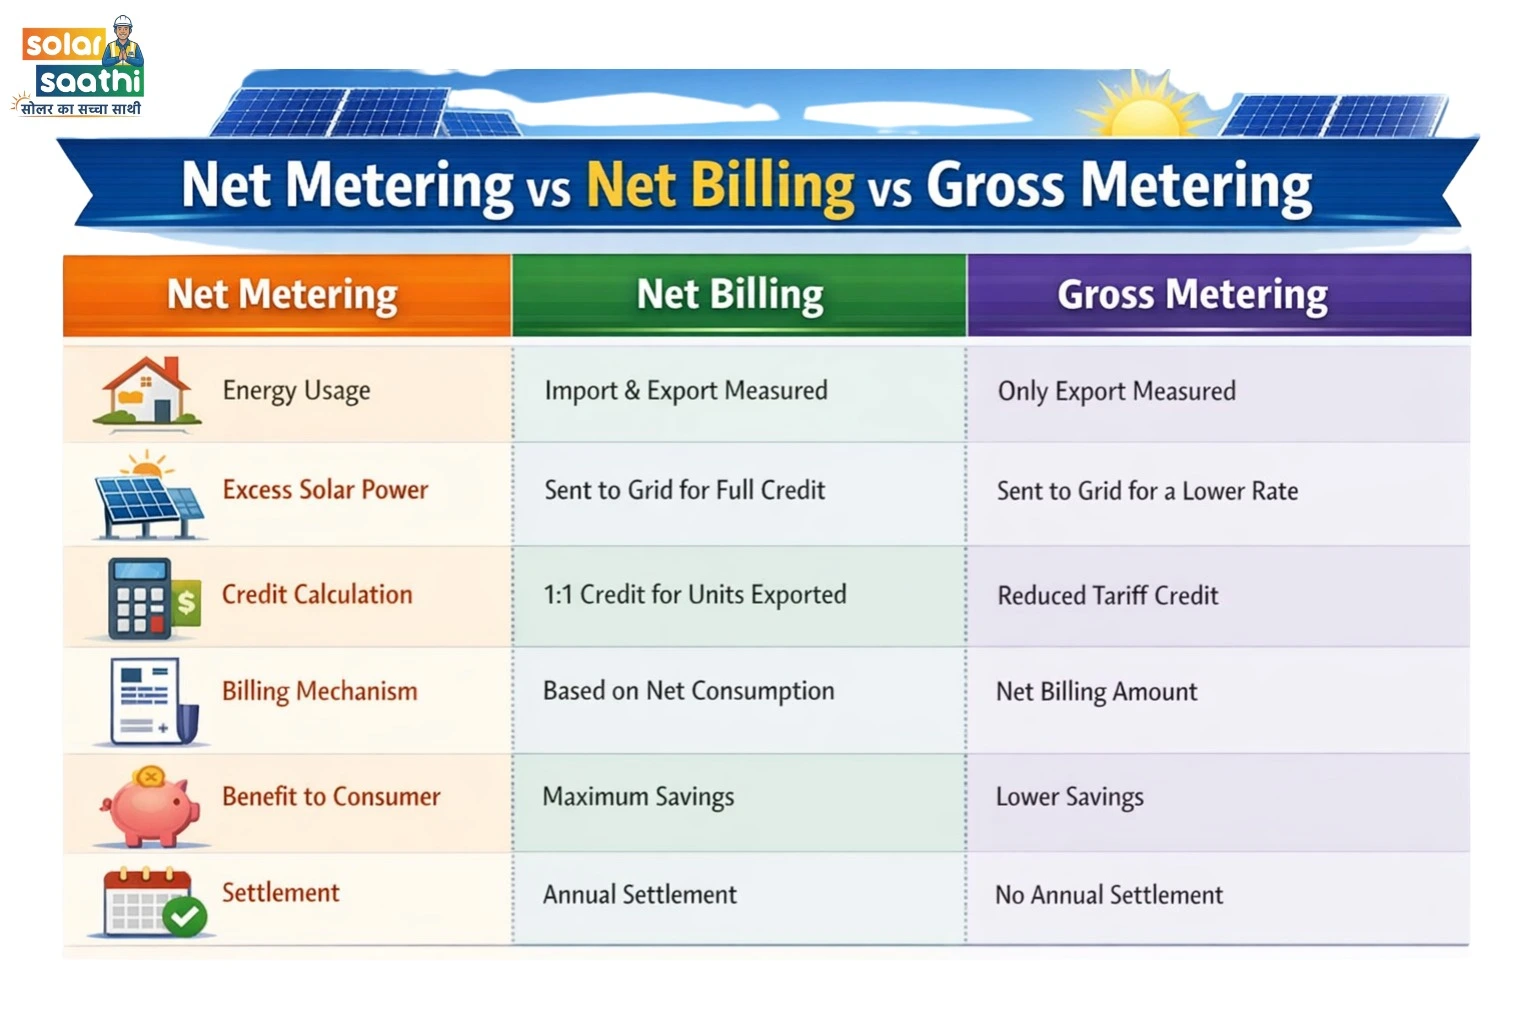
Net Metering vs Net Billing vs Gross Metering (Complete Comparison)
Choosing the right billing method is important before installing solar. Each model works differently and your savings depend on your choice.
Net Metering
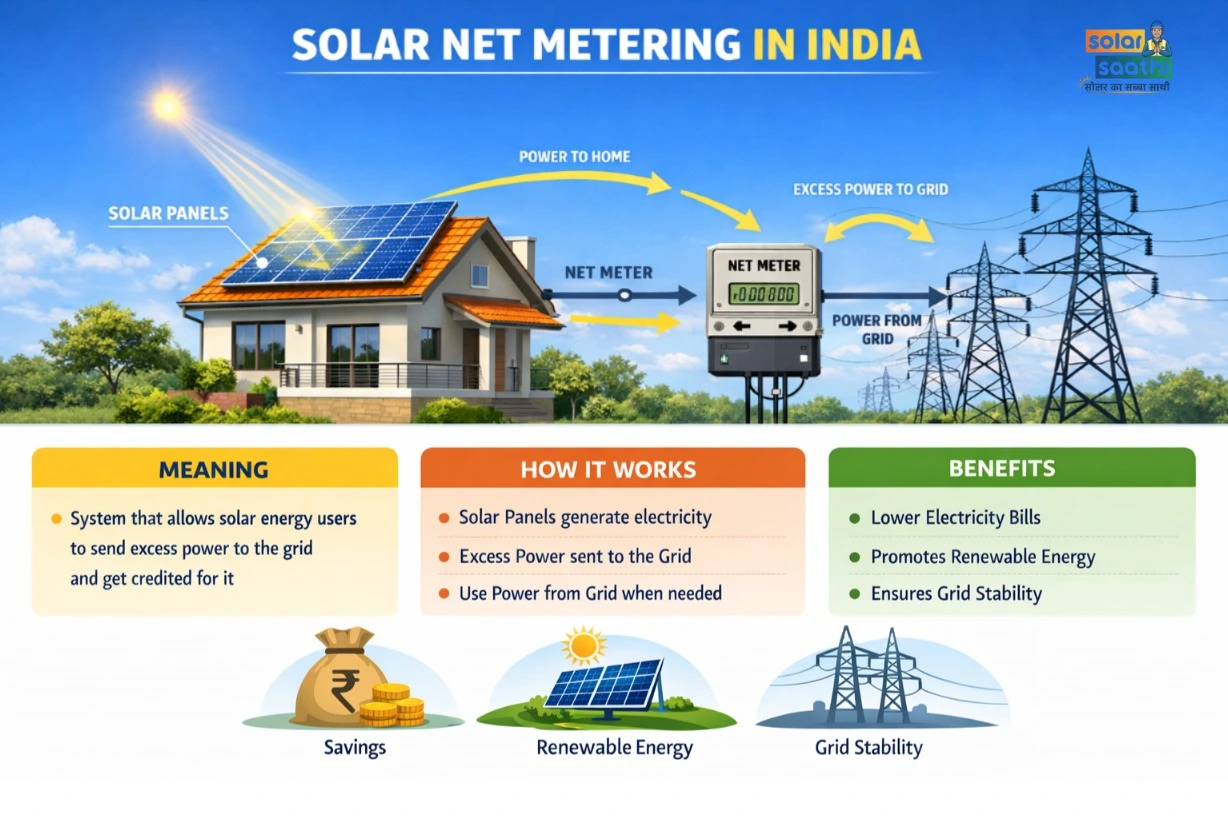
Net metering is the most popular option for homes. A bi-directional meter tracks both import and export units. If your solar system produces extra power, it goes to the grid and you receive energy credits in units (kWh). You pay only for net electricity used (import – export). This method is best for homes, small shops, and offices with daytime usage.
Net Billing
In net billing, exported electricity is converted into money, not units. The DISCOM buys your extra power at a fixed rate, which is usually lower than your electricity tariff. Billing is done separately for import and export. This reduces your overall savings compared to net metering.
Gross Metering
All solar electricity goes directly to the grid and you do not use solar power in your home. The DISCOM pays you a fixed price for total generation and you buy all electricity from the grid at retail rates. This model is mostly used for large commercial and industrial projects. To understand where solar power is actually used, you can read a detailed guide on solar energy uses.
Quick Comparison Table
| Feature | Net Metering | Net Billing | Gross Metering |
|---|---|---|---|
| Credit Type | Energy units (kWh) | Money (₹) | Fixed tariff |
| Meter Type | Bi-directional meter | Two separate meters | Generation meter |
| Billing Method | Net consumption | Separate billing | Full sale to grid |
| Savings Potential | High | Medium | Low |
| Best For | Homes & small users | Commercial users | Large solar plants |
For most homeowners, net metering gives the highest savings. Always check your local DISCOM policy before deciding.
Who Benefits Most from Net Metering Systems?
Not everyone gets equal benefit. Net metering is best suited for homeowners with high usage, small shops and offices, commercial units, and daytime users like clinics, workshops, schools, and small businesses. Daytime users benefit the most.
Different use cases need proper system planning. If you are unsure, you can learn about residential solar consultancy to design the right setup for your home.
How to Choose Solar Vendor
This is where most people make mistakes. Wrong vendor = wrong system = low savings. Before choosing, check experience and past projects, verify certifications and approvals, ask about net metering support, and understand warranty and service terms.
A good vendor handles your entire net metering DISCOM process. You can get help shortlisting verified vendors through our solar vendor selection consultancy.
Future of Net Metering in India (2026 Update)
Net metering is changing fast in India. If you do not track these changes, your savings may be reduced later.
Shift from Net Metering to Net Billing
Earlier, net metering gave full 1:1 unit benefits. Now many states are slowly moving to net billing where exported power earns lower rates. This reduces overall savings for solar users.
Capacity Limits Becoming Strict
Residential systems are generally limited to 10 kW and commercial systems to 500 kW or sanctioned load. Larger systems are often pushed to gross metering.
Rise of Virtual & Group Net Metering
Virtual net metering allows you to use solar from another location. Group net metering lets multiple users share one solar system. This helps apartments and businesses adopt solar easily.
New Charges on Solar Users
Grid usage charges, banking charges, and extra fees for larger systems are being introduced. This ensures DISCOMs recover their costs.
Latest Regulatory Updates (2026 Framework)
Net Metering Limits: Up to 10 kW for residential users and up to 500 kW for commercial users, depending on sanctioned load and state rules.
Mandatory Use of Indian Solar Panels (DCR Rule): From June 2026, only Indian-made panels are allowed. Imported panels will not be approved and costs may increase by ₹8,000–₹10,000 per kW.
Deadline for Non-DCR Panels: To use cheaper imported panels, you must register the project before March 31, 2026 and complete installation before May 31, 2026.
New Charges for Bigger Systems: Government is planning extra charges for systems above 5 kW. Small homes may stay safe from these charges.
Battery Storage May Become Mandatory: For large systems above 500 kW, battery storage may be required, which adds cost but improves grid stability.
Net Metering vs Net Billing (Policy Direction): Net metering gives higher savings (₹5–₹9/unit credit) while net billing gives lower export rates (₹2.5–₹4.5/unit). Future systems may favor net billing models.
Conclusion: Why Net Metering is a Smart Solar Decision
The net metering DISCOM process is simple if done correctly. Most people lose savings due to mistakes, not system failure. Apply correctly, track your net meter application status, and understand the net metering cost in India before starting.
It is also important to optimise your panel placement using a solar panel angle calculator to get maximum efficiency from your system.
Want to reduce your electricity bill with solar?
Get help through solar advisory services for residential, commercial, or industrial needs. A qualified solar expert can help you avoid costly mistakes in the application process.
Take action today. Every month you delay = money lost.
FAQs
How to apply for net metering in India step by step?
Start by submitting a net metering application to your DISCOM. After that, a site inspection is done. Once approved, install your solar system. Then submit documents and fees. Finally, DISCOM installs the net meter and activates the connection for energy export.
What documents are required for net metering?
You need a recent electricity bill, ID proof, and property ownership documents. Also submit solar system details, inverter specifications, an installation certificate, and a single line diagram. Keeping all documents ready helps avoid delays in the net metering approval process.
How long does net metering approval take in India?
The approval time usually ranges between 15 to 30 days. In some states it may be faster, around 10–15 days. Delays can happen due to incomplete documents or inspection issues. You can track your net meter application status online through your DISCOM portal.
What is the cost of net metering in India?
The net metering cost in India is generally between ₹3,000 and ₹10,000. This includes meter cost, installation, and testing charges. In some states, the total net meter installation cost can go up to ₹15,000 depending on DISCOM rules and system type.
Why is my electricity bill high after installing solar?
Your electricity bill may increase if export units are not recorded properly. Incorrect meter readings or billing errors can also cause this issue. Sometimes, low solar generation or high fixed charges increase the bill. Always verify your bill after net meter installation.
What are common net metering problems in India?
Common net metering problems include approval delays, incorrect billing, and export units not showing in the meter. Some users also face system performance issues due to poor installation. Choosing the right vendor and tracking your system regularly helps avoid these problems.
How does the net meter approval process work?
The net meter approval process starts with application submission. Then DISCOM inspects your site and approves the system. After installation, you submit documents and fees. A final inspection is done and the net meter is installed to enable energy export and billing.
What is the difference between net metering and net billing?
Net metering gives you energy credits in units for the power you export. These units reduce your future electricity usage. Net billing gives money credits at lower rates. This makes net metering more beneficial for homeowners compared to net billing systems.